> ## Documentation Index
> Fetch the complete documentation index at: https://api-docs.trypila.co/llms.txt
> Use this file to discover all available pages before exploring further.
# Create an app
> An app gives you the AppId and key pair that every Pila API call requires.
An app is the container your integration lives in. It carries a unique **App ID** and a public/private key pair, and every API call must identify itself with both.
Create separate apps when you want separate credentials — one per product, or one per team — so you can rotate or revoke one without affecting the rest.
 ## Creating one
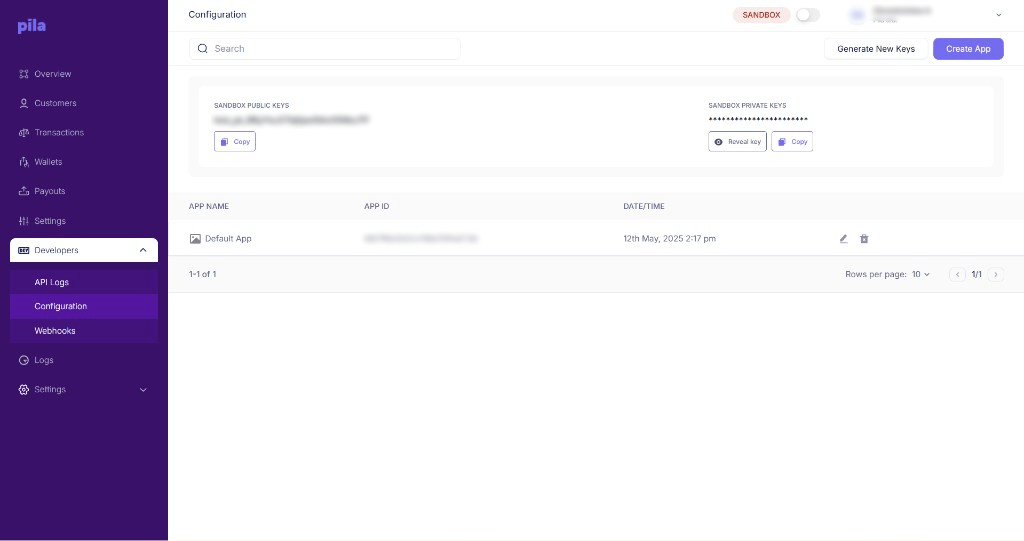
From the sidebar, expand **Developers** and choose **Configuration**, or go straight to [dashboard.trypila.co/developers/configuration](https://dashboard.trypila.co/developers/configuration).
The button sits at the top right of the Configuration page.
The new app appears in the **Apps** table below. Every business starts with a **Default App**.
It is the alphanumeric string in the **APP ID** column. This is what you send in the `AppId` header.
## Your API keys
The **API Keys** panel on the same page holds the pair for whichever mode the top-bar switch is set to. Sandbox public keys start with `test_pk_`.
Use **Reveal key** to see the private key, **Copy** to take it, and **Generate New Keys** to rotate the pair.
Your private key belongs on your server, in an environment variable or a secrets manager. Never commit it, never put it in a mobile app or browser bundle, and never send it to anyone — including Pila support.
Full detail on keys and app management: [Configuration](/dashboard-guide/developers/configuration).
## Getting verified
You can build in sandbox immediately, but your company must be verified before live keys will work. There are two steps, both completed by your company's authorised signatory: identity/business verification, then signing the SLA.
See [Company verification](/dashboard-guide/account/company-verification) for the walkthrough.
## Next
Put your `AppId` and key to work.
Create a wallet and send a transfer.
This documentation is built and hosted on [Mintlify](https://mintlify.com), a developer documentation platform.
## Creating one
From the sidebar, expand **Developers** and choose **Configuration**, or go straight to [dashboard.trypila.co/developers/configuration](https://dashboard.trypila.co/developers/configuration).
The button sits at the top right of the Configuration page.
The new app appears in the **Apps** table below. Every business starts with a **Default App**.
It is the alphanumeric string in the **APP ID** column. This is what you send in the `AppId` header.
## Your API keys
The **API Keys** panel on the same page holds the pair for whichever mode the top-bar switch is set to. Sandbox public keys start with `test_pk_`.
Use **Reveal key** to see the private key, **Copy** to take it, and **Generate New Keys** to rotate the pair.
Your private key belongs on your server, in an environment variable or a secrets manager. Never commit it, never put it in a mobile app or browser bundle, and never send it to anyone — including Pila support.
Full detail on keys and app management: [Configuration](/dashboard-guide/developers/configuration).
## Getting verified
You can build in sandbox immediately, but your company must be verified before live keys will work. There are two steps, both completed by your company's authorised signatory: identity/business verification, then signing the SLA.
See [Company verification](/dashboard-guide/account/company-verification) for the walkthrough.
## Next
Put your `AppId` and key to work.
Create a wallet and send a transfer.
This documentation is built and hosted on [Mintlify](https://mintlify.com), a developer documentation platform.